Send your first campaign
A step-by-step walkthrough from a brand-new account to your first sent email.

This guide walks you from a brand-new account to your first sent email, one step at a time. Most of it is quick, and you only set it up once.
When you first sign in, EmailFig opens on Get started, a short checklist covering the same steps. You can follow it there, in any order, or use this guide for more detail.
One tip: do step 1, your sending domain, first. It’s the only part that can take a while to switch on, and it does that in the background, so you can start it and set up everything else while it finishes.
1. Set up your sending domain
Your emails go out from your own domain (like yourcompany.com), so inbox providers trust them and they stay out of spam. To set this up, you add a few records wherever you manage your domain. That proves the domain is yours.
- Go to Settings → Sending domains and click Add domain.
- Enter the domain your business uses, like
yourcompany.com, and click Add domain again. A subdomain works too. - EmailFig shows you a short list of records to add. Copy each one into your domain provider exactly as shown.
- Come back and click Re-check DNS. You don’t have to wait around: EmailFig keeps checking on its own and emails you as soon as the domain is Verified.
Most domains verify within an hour, though DNS changes can take up to 48 hours to spread. That’s normal, and you can carry on with the rest of this guide in the meantime.
Want help with the records? Add and verify a sending domain covers it in full, and Publish DNS records at your domain provider has steps for the common providers.
2. Add your mailing address
Marketing emails must by law include a real postal address, so EmailFig won’t let you send without one.
- Go to Settings → Unsubscribes.
- Under Mailing address, enter your address. A street address, a registered P.O. box, or a private mailbox all work.
- Click Save changes.
On the same page you can choose what happens when someone unsubscribes: Simple (one click and they’re off everything) or a Preference center (they pick which topics to keep). Simple is a fine place to start. See Customise the unsubscribe experience.
3. Add your contacts
Your contacts live in lists. You choose who gets each campaign later, when you build it: everyone subscribed, or only the people with a tag or in a segment.
- Go to Contacts → Lists, click New list, give it a Name, and click Create list.
- Go to Contacts, click Import CSV, choose your file, pick your new list under Add to list (optional), and click Upload & map columns.
- On the Map columns screen, tell EmailFig which column is which. One of them has to be the email address. Click Start import.
You’ll see progress as it runs, then a summary of what was added.
Only import people who asked to hear from you. A bought or scraped list can get your sending paused or your account suspended. See Why you shouldn’t send to purchased lists.
4. Build your campaign
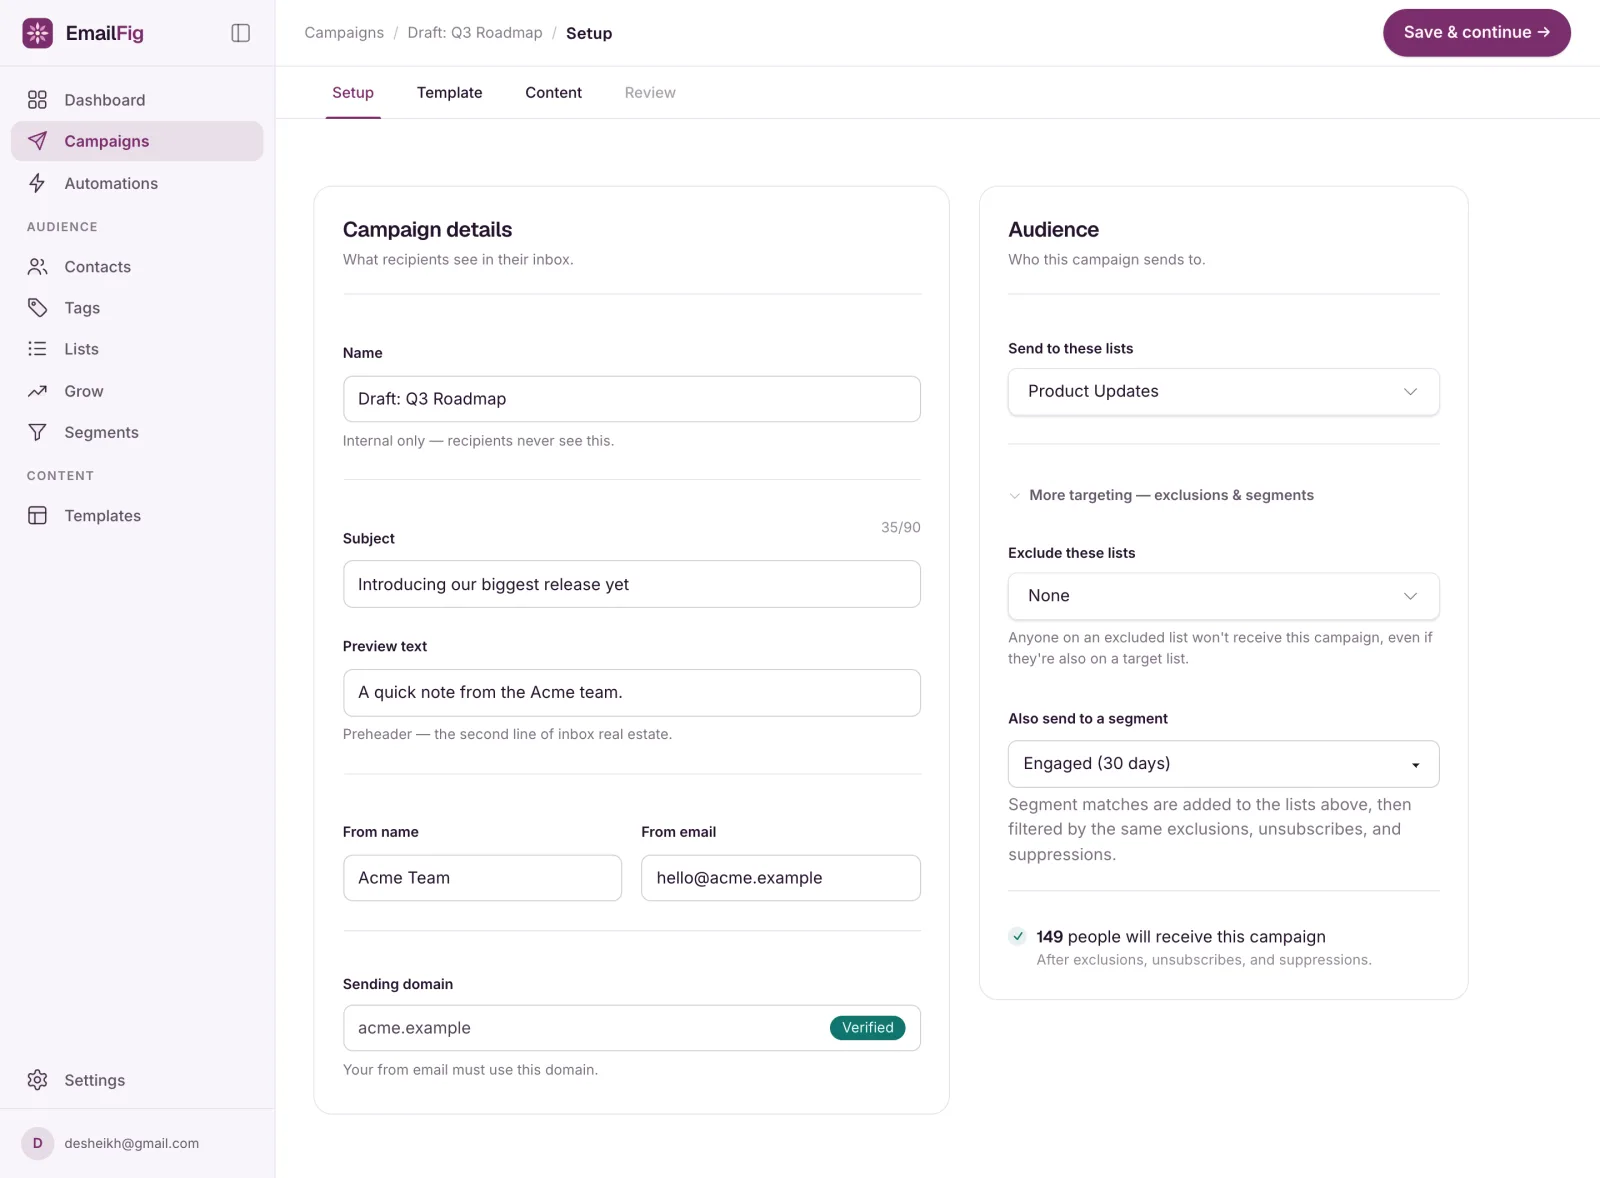
Go to Campaigns and click New campaign. This creates a draft and opens a builder with four steps across the top: Setup, Template, Content, and Review. You can move between them freely. Each step has Save to keep your work and Save & continue → to move on, so save before you leave a step.
Setup is the campaign’s basics, in two cards:
- Campaign details: a Name (only you see it), the Subject line, optional Preview text, and who it’s from (From name and From email). Your from address has to use the domain you verified in step 1.
- Audience: who it goes to. Pick All subscribers, Tags and segments to narrow it down, or Custom rules to build a one-off rule for this campaign. A running count shows how many people will receive it.
Click Save & continue →.
Template is your starting design. Pick one of Yours, choose from the Gallery, or write from scratch with Drag & drop or HTML. Then click Continue →.
Content is where you write and design the email. The footer needs an unsubscribe link and your mailing address. Every Gallery template already has both. Use the merge tag menu to add personal touches like a first name.
More detail: Choose your audience and Merge tags: personalise with contact data.
5. Send yourself a test
Always send yourself a test first. In the HTML editor, click Send a test at the top of the Content step, enter your address, and click Send test email. The drag & drop editor has its own test button inside the editor.
Tests can go to you or anyone on your team. From the HTML editor they can also go to any address on a domain you’ve verified. See Send a test email.
6. Send it (or schedule it)
The Review step shows a preview of your email next to a short checklist called What’s left. It lists only what still needs doing. Once it’s clear, you’ll see Ready to send with your recipient count.
Click Send or schedule…, then choose:
- Now to send straight away, or
- Later to pick a date and time.
If Send or schedule… is greyed out, something on What’s left still needs attention. Each item links to its fix, and Why the Send button is disabled walks through them. If the campaign needs more emails than you have left this month, you can still schedule it for after your allowance resets. See Your monthly email allowance.
After you send
Your campaign’s page updates as it goes:
- Preparing: EmailFig is getting the send ready.
- Sending: your emails are on their way, going out in a steady stream rather than all at once.
- Sent: all done. The page becomes your report, with opens, clicks and more.
- In review: now and then a campaign is held for a check before it sends. We email you when that happens, and once it’s approved it sends on its own. See My campaign is “in review”.
- Failed: something stopped the send. The page explains what, and offers Revise so you can fix it and try again.
Opens and clicks start showing within minutes. See Read a campaign report.
Where to go next
- Why the Send button is disabled: the full pre-send checklist, item by item
- Platform sending or your own Amazon SES: which to choose
- Switching to EmailFig from another provider
- What is an automation?: welcome emails and other messages that send themselves
Stuck on any step? Email contact@emailfig.com and a real person will help. See Contact support for what to include.